Thursday 31 October 2013

GET THE LOOK: DINNING ROOM

If you're like me, then you buy most of the stuff on Internet. Unfortunately I still don't believe enough to buy clothes that way (I must try it on before buying), but everything else is coming into my house that way.

There are a few shops I visit every time in search of something, and if I'm lucky those visits are fruitfull. But if not, there are my best friends - eBay and Amazon. Beacuse I hate wondering around in search of anything.
Most of the people are afraid of buying something without seeing it in nature, but I must admit never buying something wrong. Sellers are providing pretty much good descriptions of items. On the other hand, you shouldn't buy big and expensive stuff when there are no customer reviews for particular product. Another possibility is to contact seller, asking for more detailed informations, especially if you're buying new on the market product or used one. 
And, last thing is to look for detailed seller info, recent customer feedback and overall rating. Never buy items from seller without at least good ratings.

I have decided, once a week to choose an inspiring photo and try to copy its look with the stuff found on web. Section is called GET THE LOOK. Also a section GET THE LOOK ON BUDGET will come soon.
Most of the time I look for things on Amazon.co.uk, because the shipping to my country is still fairly rare or cost too much, while our local stores do not deliver the goods abroad and they are unusable to readers outside Croatia. For eBay I reach out less often, mostly when looking for vintage stuff.


First inspiring photo is this dinning room from 25.media.tumblr.com


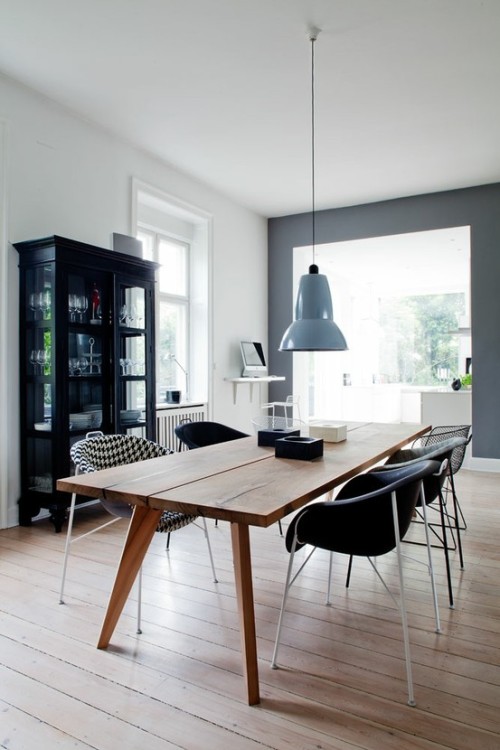
A beautifull and clean room, with wooden desk and rustic light colored wood floor. It is a little bit Scandinavian, a little bit industrial, and also ecclectic and vintage. Everything I like!


1. Retro Eames inspired Eiffel chair
2. Opulence Chair White
3. Ariana Angled Oak Veneer Wood Dining Table 150cm 5ft Flatpack
4. Tradition Bulb Pendant
5. IKEA Hemnes glass- door cabinet
6. White Shaker Wooden Tissue Box Cover
7. YSYT Black-Crocodile Leather Pattern Wood tissue box
8. YSYT Ostrich pattern leather wood tissue box
9. Lloytron L855BC Studio Poise Halogen Hobby/ Desk Lamp - Brushed Chrome
10. Premier Housewares Wooden Console Table, 76 x 40 x 78 cm, White-instead of single shelf for laptop
11. Stallion Bar Stool Cream & Walnut-as working chair, or if you lack of space
12. Premier Housewares Rectangle Shaped Folding Stool with Chrome Frame, 49 x 35 x 24 cm, Cream

I am a registered user of Amazon.co.uk Associates program, and each of your possible purchase after visiting my site will result in a small fee paid by Amazon. Thank you!

Sunday 27 October 2013

DIY: ADVENT CANDLE HOLDER


I'm always trying to make, instead of buying gifts. Some people are pleased with those unique things, and some are not. I don't care about them much. In my own defence I can only say that I always put all my efforts, imagination, love, time and capability to make those gifts. And I'll never give something not looking perfect (perfect too me ;)). I don't like things looking too much homemade...don't know why :D

Here is my version of Advent candle holder. It is made from glass plate and 4 small rakia (to the rest of the world more known as grappa) glasses and silver glitter. Everything is bought at Offertissima (something like Dollarstore) for almost nothing.

I have great stencil with letters and numbers, but couldn't find it. Those numbers are printed, cut and glued to masking tape.
Glitter is glued with regular white glue for decoupage (don't ask me why...), and when it dried I put one layer of water based varnish just to seal it. Glass parts are glued with epoxy glue.

Hope it won't peel off under heat...


Saturday 26 October 2013

RECIPE: BEAUTIFUL APPLE CINNAMON MUFFINS

I'm not much into cooking & baking posts, but this time I just can't resist writing about the best Apple Cinnamon Muffins I have ever tried before :)) They're so soft, moist, fluffy...and easy to make.

So, I have searched through Internet to find some easy and quick recipes with apples. Finally found one I liked, buh didn't have enough eggs to make it, and in the same time didn't want to cut everything in half.

I'm not the recipe person. For me it is impossible not to change at least 30 % of it...and I'm incapable of repeating the same meal twice.

At our home is like going to the different restaurant every day ;) For that reason I did something I never do - I wrote recipe down this time!

APPLE CINNAMON MUFFINS
For about 22 muffins

2 eggs (they don't have to be large, I got only small ones)
10 Tsp sugar
1 Vanilla scented sugar ( 2 tsp )
1 baking powder ( 2 tsp )
12 Tsp flour
10 Tsp oil
10 Tsp milk
1/2 cup yoghurt
lemon peel (from 1 or more lemons)

FILLING
3 large apples
1 Tsp sugar
Cinnamon (as much as you wish)
Marmelade (optionally, a few spoons)

Whisk eggs with sugar. Add flour and baking powder. Then add oil and milk. And on the end add lemon peel and yoghurt. Whisk a little bit more.


For filling, cut apples in tiny cubes and add sugar and cinnamon.
I had no time to cut small pieces. So, you can use a blender, but don't turn apples into paste. Stop when there are still some chunks. I have divided filling into half and mixed some homemade peach marmelade into one half.

Preheat your owen to 180ºC (350ºF).


Take your muffin pan, insert paper cups and fill them with batter only half way than 
normal. Put a pan into owen for a 5-10 minutes. You must take it out when batter starts to raise.


Put a generous tablespoon of filling onto every muffin and cover it with batter. Cups should be full now.


Bake another 15 - 20 minutes, until the tops are golden. Take them out, and let them cool a bit.


When cool, sprinkle with powdered sugar.


And - EAT! ;))


Bon Appetit!
<Marta>

Sunday 20 October 2013

INTERIOR TO LOOK AT: WHITE LARGE APARTMENT IN LINNESTADEN

A beautiful and stylish 101 sq meters apartment in Linnéstaden, Sweden. Renovated, with 3 rooms, spacious, great kitchen,...After renovation they've kept some original features like tiled floor, stucco, ceiling medallions and mirrored doors. 


KITCHEN


Large kitchen with dinning area is just calling for socializing with friends. The disposition with a big kitchen and direct contact with the living room is absolutely unbeatable!


Some kind of motivational to - do list on the wall...very cool!


HALL


The hall with fresh white walls and the floor has original "vitsåpat" tiled floor which runs on into the living room, kitchen and family room .


BATHROOM


Square in shape with bright tiled walls and a light floor. Pretty original state except modern shower separated by a glass wall. 
  

LIVING


It is used as less private living space, connected with kitchen...You'll see why later! 


PRIVATE LIVING ROOM


The rounded wall with a floral wallpaper in muted colors from Mr Perswall. Those colors provide contrast against the other walls painted in a white.


Sooo exciting! Another great room, second living room, but much more private! Used for several functions, as office, playroom,  library, closet etc.  The room is large, with irregular walls which are creating character and possibilities.


BEDROOM


Along one wall is a closet wall with closets repopulated with contoured white doors in the old style that takes care of storage. Another closet space is hidden in previous room, so there isn't much need for more furnishings - everything you need is bed! And those large mirror ;)

<Photos via ALVHEM>

Friday 18 October 2013

OLDIES: DIY PHOTOCOPY TRANSFER ON PAINTED WOOD

As a environmentally conscious citizens we're hoarding empty bottles on our balcony. And we just can't remember to carry them back to the store. It was a complete mess.

So I've found old and worn out wooden case...


STEP (1)
Old wood, completely dry, extemely thin (most cardboards are thicker than this) and very ragged...I couldn't grind, there was no space for it. But, glass paper did its job though. Now I'm not afraid of having splinters in my fingers.
First mission completed!!  


STEP (2) 
Painting...it wasn't clear until then - it is still ragged. Foam roller ended in garbage...ragged also. I had to continue with brush.
And, I've made a mistake not reading the paint label. Instead of water based paint, I took an oil paint...what a mistake!
Dirty shade of white, two coats, whole room stinks and discovery! I didn't have to make it look shabby..it is already shabby.


Drying phase.

STEP (3)
When it was dry, I wiped it, and prepared acetone, laser prints (printed backwards), some napkins or cotton wool and wood glue.


STEP (4)
Pictures are cut and there it goes...next mistake.
Too much paper left around...


STEP (5)
Glue goes on the right side of picture. Every inch must be coated evenly.
Don't make my third (or maybe fourth) mistake and coat it too thich. It'll never dry.


STEP (6)
Picture is carefully placed on case. There are no bumps. I just had to wait for it to dry.


STEP (7)
It is dry? Ok, ready, steady...go!

Napkin is moisted with acetone and a very long procedure is getting its way...

Endlessly rubbing on paper, softly and gently, in circular movements. Paper starts to strip soon, but this striping is never-ending...


It looked like it is almost over after about 30 minutes, but after it dried, it became obvious it is - NOT. 


Half hour later it looked better, but only on photo...


STEP (8)
Varnish, finally...what a relief (after 2 hours)!This case is supossed to stand outside on balcony whole year long and must be well protected.


I'm satisfied with the result. It was long process and I'm not sure will I ever repeat it...but it was worthed all the pain ;)